漫画を買うなら楽天kobo(電子書籍)が断然オススメ!
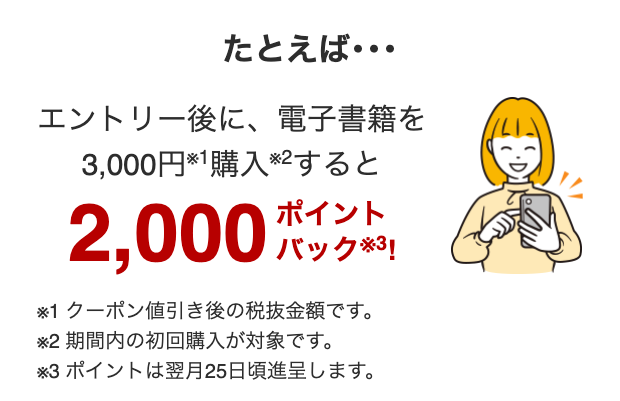
For example… After entry, if you purchase an e-book for 3,000 yen*1, you will receive 2,000 points back*3! *1 This is the amount before tax after the coupon discount. *2 Only the first purchase within the period is eligible. *3 Points will be granted around the 25th of the following month.
Hey Ciyo! Are you enjoying the new scenario?
Chyon
Hey hey Chiyo
What do you think about Haiseiko and the luck-based elements of this scenario?
>>3
Since it’s a dog that can’t be helped, I’ll teach you!
The concept of the high school soccer route is no longer “practice with many people!” Research has progressed significantly, and the way of thinking has changed from the very foundation.
The strategy for the High Seiko Route is
“It will be a route where intentional double tags and smart tags will be initiated!”
It means that having a lot of mobs does not necessarily mean the practice is strong, and it’s not a route where you can form friendship tags entirely!
That way of thinking is wrong from the start!
The strength of the High Seiko route is that, as mentioned later, “only on the High Seiko route can you definitely create situations for double tags and intelligence friendships”!
Chiyo is taking a break.
Good night!
“Is it a high-risk level?”
→What do you mean? How can a double tag happen intentionally?
When the friendship gauge reaches MAX, “the support character Uma Musume will be fixed to the preferred practice regardless of the proficiency rate.”
The greatest strength of the High Seiko Route is concentrated here!
As long as the friendship gauge reaches MAX, that support character will stay in that practice indefinitely!
This will always be here regardless of the winning rate!
This specification, when turned around,
“It means that a support horse with a maximum friendship gauge will only show up in favored training situations, aside from the support card multiplication effect!”
If you’re going to perform high-level practice.
“Moderately consume the friendship gauge of support characters’ horse girls → Charge the practices that should be extended and intentionally aim for double tags.”
Awareness of this point is extremely important!
Honestly, understanding this part is more important than the fact that it comes out in 9 different colors! This is the most crucial part of the high success route! It’s about this rather than luck!
In other words, do we need to be aware of the favorite training of the additional members?
Is that something that corresponds to an estimated number of R cards…?
>>8
The members that come out have their specialties displayed properly!
It seems that the fact that Romnu is often intelligent is thanks to Seiko, even though their proficiency rate isn’t that high.
It appears at MAX gauge during the additional time in the High Seiko route.
It means that it’s something you should remember for the first practice of the summer training camp.
Hey, Chiyo.
How about the other routes?
Soo-san and Centlight-san, etc.
Hey, yo.
Is double tag referring to W friendship?
Double tag…?
Due to this, the order of practice will be almost fixed from the start of summer!
The stamina, which has a relatively high number of practice sessions, is what I want to quickly refill the friendship gauge and spin again.
Please provide the Japanese text you would like me to translate.
I want to use the recovery effect wisely, so I want to activate it early and use it for health management in the next guaranteed state.
Please provide the Japanese text you would like me to translate.
Speed has a high success rate to begin with, so it can draw a double tag without needing to use this specification, which can lead to the idea that its priority is low!
When written like this, the order of stepping three times in summer is almost fixed!
Stamina → Wisdom → Speed!
The subsequent maneuvering is
– Prioritize stamina while maximizing the wisdom gauge.
– Since speed is a low priority, use it as a gauge-raising resource without worrying about double, unlike others.
– If the next practice for Mob Tag can max out stamina and wisdom, it holds high value as a practice.
You will be able to see it that way!
The foolish dog that thought the current story was difficult.
“For now, ‘maxing out the wisdom gauge allows you to practice recovery at any time, so raising the wisdom support gauge is the top priority.'”
I think that just by thinking about it like that and acting accordingly, it will change quite a bit!
Since the speed has a high output, it can reach the maximum without stepping on the double tag.
If you want to max out your stamina and determination, understanding this mechanism is essential!
It’s a route for building up support gauge for practice items that can respond to situations where you can aim for a double!
>>16
Thank you, I’ll remember this much, Chiyo…
In other words, it means that the number of gauges to manage has increased… it’s quite difficult.
I don’t understand what you’re saying, so this is the real Chiyo.
On one hand, it’s appreciated to stay in the practice area you’re good at, but on the other hand, it is quite a troublesome feature.
In a unison performance, if we don’t forcibly drag out someone who’s not good at practice and make them bond separately, they might just stay there indefinitely.
It means I should also look at the mob’s gauge, right?
Based on what Chiyo-chan said, it seems that if we can find the optimal approach for this scenario, we might be able to finish the training quite quickly.
But managing the gauge is a hassle, isn’t it?
Could it be that we need to pray for the type of support card from the collaborator?
>>23
It is not.
Let’s only manage the friendship gauge for formation support!
When the friendship gauge reaches MAX, support for the formation.
“The support card will continue to linger regardless of the proficiency rate in the preferred practice.”
So for example
If the wisdom support character is at maximum friendship gauge
In the following turns, you will definitely be able to perform friendship practice with a high recovery effect from the wisdom support.
If both stamina support cards are at max gauge, then I have two other stamina support cards as well.
In the following turns, you can definitely use Stamina Double.
→In other words, calm down and recover once → then practice friendship → activate the green effect and then definitely step on double stamina.
You can create combos with intentional control like that.
Utilizing this specification will be the high-quality route!
>>26
So, that’s why if I can get hints related to it, I will take them.
>>26
I didn’t know about that specification…
>>29
Read it properly!
And then, from here, it’s about the luck of the things that will come out next in color!
It is often said that taking two ties is the starting line.
This is “half correct and half incorrect”!
The reason is that there is a problem with the color distribution!
If you want to solidify the high school route.
Red 3 requires aiming for 2 or 1 with green and blue!
In terms of green cards, there are many that are quite powerful at rank 3! Blue also has some very strong effects at rank 2!
On the contrary, the red color has “not much effect against Rank 3”! I want to enter the High Seiko route, but the Rank 3 of High Seiko isn’t that strong!
The ideal is to fill rank 2 with red, and for rank 3-related items to be green or blue, as that would be more favorable!
…Thinking about it this way, the merits of aiming for two colors at rank 1, considering the later friendship gauge increase, becomes a double-edged sword!
I think there are many dogs that have gotten stuck because they didn’t enter the route while choosing a rank 12 color bond in a brain-dead state! It’s not necessarily important to aim for a bond as the first move!
If you can win someone’s affection, sometimes it’s enough to have just one bond.
Chiyo-chan is smart…
I don’t understand.
I was undergoing training that shone with atmosphere.
I understand that it’s a scenario where you’re doing friendship training while involving support cards that have reduced gauge, not just a straightforward friendship training scenario.
It’s not going well, but…
If the additional member’s specialty practice is wisdom and they are shining, will the recovery amount increase?
Conversely, if the gauge is at MAX, the child will continue to linger in their preferred area.
Can you mix in with the other practices?
Therefore, the effect of support cards that proliferate at green rank 3 and red ranks 2 and 3 is quite powerful.
Even if one side continues to stay, it will appear in another practice and activate various synergy effects.
Although it’s easy to focus on Friendship 22 or 25, it’s important to recognize that this effect is quite powerful in the High Seiko route!
I don’t know the training schedule for the future.
I wonder if it’s possible to manage the gauge…
>>35
If you keep at it, you’ll eventually be able to do it.
The amount by which the gauge increases will at least make the next practice predictable.
So you will be able to do it.
>>36
I see, you can tell whether it will reach MAX next time or not.
>>36
You are too much of a champion in demeanor, ciyo.
It feels like a Derby horse.
For now, I will try to be aware of it…
>>35
I think it means that once the gauge reaches max, the next training will be confirmed, so be aware of that.
>>42
If you understand this specification
If both stamina and guts support reach MAX (or if one is filled and both end up at MAX) now,
This practice will help you understand how to definitely double-step in the next session.
If you understand this
In the next turn, step on a different weak friend’s bond after recovery (this will activate the green friend’s bond for the next turn, 25 etc.) → By stepping on the confirmed double practice, you can easily achieve maximum output in practice!
Whether or not there is a Unison Performance that allows you to drag out mobs that are lingering in unregistered training and consume friendship gauge really changes the status quite a bit, doesn’t it?
It’s a simple story: everyone should go through practices where they are all shiny and golden, and then they can move on to the practices where there are many characters that are poor and have empty gauges.
I’m running it just because auto is easy, but I feel like I’ll never understand it…
In other words… is it better to have Speed 2, Stamina 2 or Power 2, Wisdom 1, and a Legend?
I want to practice while having the delicious green effect with the gauge at MAX.
It feels like if I can do a lot of that, I’ll grow.
In order to step on a lot of delicious things, I will consistently stock up on wisdom to recover my stamina gauge while also properly raising the other gauges.
Yeah… there’s quite a bit of room for thought here!
I guess the reason I only landed in good places was because I was stepping on the ones that just happened to be abundant… I understand now.
>>45
For example
If there’s a Moai shining with a Speed 2 formation and about three friends are around, I’d be tempted to step on it, but if in another practice, the Still friend gauge is just one more step from being full, then I could go step on Still for a while, which would guarantee double friendship training from the next turn onward.
If I think that this guy will come to his favored practice next,
It might change the way we approach it, for sure.
Hey, what’s up?
Is it strange that while everyone is spinning the support cards with their stones, I’m spinning for the characters because I want to read the story?
>>47
If the person who spins the story develops it at least three times, the index stone will increase.
I think your approach will probably accumulate more stones in the end than that of someone who is stronger in training.
Once you reach the late stages of UC or UB, it’s hardly going to go up at all!
The biggest problem is that when you properly think and take a step forward, there will be more opportunities where the gauge of understanding and the training you want to take do not match…
However, since you can’t level up with a full gauge, the ideal is to practice when you have both the glowing ones and the ones with an empty gauge gathering at the same time.
“Do you think such a thing conveniently happens every turn, you idiot?!”
Is it better to stop being a Highlander, Chiyo?
>>51
I think the evaluation of Highlander has changed quite a bit because of this!
Even without a double, it will be possible to further improve practice forecasts.
You will be able to create a definitive practice procedure!
The problem may be that the practice becomes too standardized, leading to frequent occurrences where “other support is not mixed into the practice of stepping itself.”
It’s strong, but the disadvantages are significant, so I think it’s probably weak as Chiyo.
In this case, while the training effect is high, there may be ways to utilize support cards with low skill activation rates.
Usually, I go out on business trips here and there while accumulating points.
When it reaches MAX, it seems like you want to stretch it in the places you originally wanted to hit.
>>53
It seems like there is something that makes Ramone feel easy to use.
Could it be that Spree 3 is trending because it’s possible to aim for a guaranteed triple?
I thought they were lacking in intelligence, but somehow they managed to pull through at the end… so it makes sense now… they must have been sticking to their strengths in practice.
I understand what is happening, but I don’t quite get why it is so strong.
Hey chiyo
I returned, but should I level up things like awakening and hint rates?
I want to step on it as much as possible, so the proficiency rate becomes a landmine with Seiko-chan’s training.
>>61
Regarding the success rate, one could say that it is both true and not true.
This also has its pros and cons!
In the first place, a “winning rate” is necessary to intentionally trigger a double.
If you can establish intelligence, it’s definitely stronger to step on intelligence consistently.
If other kids join in, then we can aim for a different practice that ensures a double tag.
So,
The oil for causing an engine explosion will become a specialty rate.
The higher, the better; personally, I would be happy with this scenario.
It’s better to increase the gauge and have friends show up during a practice you excel at, as it increases the success rate.
I see, it would be nice if we could adjust the two cards so that they become a double.
The Ramone in Seiko-chan’s route has a devilishly strong capability to cover the skill rate with max gauge while also being able to handle field trips with a training effect of 25.
>>63
By the way, the unique abilities significantly increase convenience, huh?
What kind of support card setup is good?
If it becomes possible to intentionally aim for a double, then it seems plausible to have a support with a zero success rate for a two-type consecutive.
Is Chiyo assuming something like speed 2, stamina 2, and intelligence 1?
Or is it Wise 2?
Is it the case that the most optimal practice is when you can collect the gauge of other supports while stepping on friendship, Chiyo?
It looks like the reduction in stamina consumption is strong… I can only use Spifuku besides my friends!
I don’t really understand routes other than Seiko-chan’s.
Especially since I’ve never even taken the St. Light route, who is the strongest after all?
Even if it’s not MAX, it’s nice that it becomes easier to use due to its high proficiency rate.
Isn’t the next training effect that is abundant in green continuous even with recovery in between?
In the end, it tends to focus on fixation.
To be fixed, it must shine before being fixed with a skill rate!
Taking that into consideration, it’s completely valid to give up a 25 percent increase in practice to achieve a higher proficiency rate!
If you’re attacking, it’s unnecessary, but as mentioned above, it’s not that practice will conveniently shine just like that, so it’s better to have a proficiency rate for that!
Just changing the way you look at delicious practice seems to make quite a difference.
It might be better to have a proficiency rate since it shines even without a best friend gauge.
I don’t really understand…
Seikoro goes to UC even if it’s casual, so I’ve never seriously thought about it.
Hey Chiyo
Please tell me the tips for the Speed Symbol Route.
>>81
If you want to be taught, there is a way to ask, right?
>>83
There is a bone here.
>>81
Spin the pachinko with a retention rate of 30 percent!
Seriously speaking, the Speed Symbol Route is really suitable for maxing out the level.
For example, if you just wanted to max out stamina and speed, I think Spichin would be fine.
The overall strong one might be Seiko Route, but even including control knowledge, Seiko Route can be extremely biased at times!
Mainly, speed maxes out in no time!
Considering that, if you continue practicing the same drills for an extended period and want to drastically improve your status, I think Speed Symbol would be the way to go.
If you ask whether it’s strong, if you can master it, it’s probably weak.
Yeah.
>>86
Eh…!
Well, even if you enhance the proficiency rate, it doesn’t guarantee that you can hit it reliably when it’s not at MAX.
I think it depends quite a bit on my mood.
Unlike Sent Light and Spishin, which are troublesome without a winning percentage, I think it’s fine if the reason for prioritizing is just low enough.
Are you really going to avoid the race 60% of the time?
Hey Chiyo.
Under that theory, what kind of support card composition and what kind of stats did it achieve?
Is it weak if you can use it well…?
Well, it’s pachinko after all.
You can challenge the pachinko three times.
For that, the stat upgrade is pretty disappointing.
If there is purely support card power, then it seems fine with Su-san.
I was just going with speed 2, power 1, root 1, intelligence 1 without thinking, but it seems like it would be easier if I solidified it.
So I’m satisfied, so I’m going to go vandalize!
>>94
Chiyo! (Bashii)
>>94
Don’t go.
Don’t go.
Stop!
I was watching the conversation, and it said for sure that they’d stick around, but wasn’t there a time when they weren’t even at practice?
Chiyo is smart.
I’m a terrible trainer…
I don’t hear much about the St. Light route… I wonder if research on it isn’t progressing.
By the way, how is Saint-kun doing?
>>100
For the time being, taking a break → There is a method to aim for 4 turns during the friendship interval and definitely achieve high practice.
I think it’s strong, but I wonder if the direct impact of the character’s racing schedule will be as tough as it is for Spichin.
By the way, when using auto for the factors, it’s only Saint Light!
No matter how much my motivation decreases or my skin breaks out during the race, I won’t drop from my super good condition!
By the way, no matter how much you lower motivation with consecutive races, if you become extremely well, you will definitely return to your original state after it’s over!
The adjustments to the race and the increase in motivation from winning the race are also accelerating things!
I think the St. Light is the easiest for auto-spinning.
Is this a thread about Pool Training for Hishi Miracle? Uh… (typing sounds)
>>101
Don’t act like a strange vandal, you idiot.
Unlike St. Light, I don’t hear any really strong stories about Su’s route…
>>102
The problem is that pachinko itself is too weak, despite being pachinko.
The advantage of being able to practice without considering the success rate has no meaning at all if you’re just playing pachinko.
I’ll create a naughty thread about Gentil and provoke other strong Uma Musume!
Hey chiyo
What else should I get for Central Route besides Off We Go and Charity?
I wish there had been a bit more of a step-up when failing at pachinko…
It seems that Su-san should extend the life of pachinko in the target race to get the 7T bonus.
>>107
Well, it sometimes ends on the 5th turn anyway!
I mean, I think it would have been better if simply taking a break or failing to continue only affected the stat boost up to that turn.
Since I have to avoid failure while not taking a break, I tend to end up in races that I don’t want to do.
Even with just a little adjustment, Su-san was able to avoid the target race on the 6th turn, but for Maa-chan, doing the 7-turn challenge three times was too difficult.
Ah, Mr. Furioso is doing stealth marketing again!
Is this a thread based on Tomakomai? …Whoa!
>>113
Mr. Furioso is going crazy and has revealed his ID.
It’s my win, isn’t it?
So that’s why Spi3 is so hot right now.
I wanted Sue to end with something like a break or an outdoor race instead of a fixed failure rate.
>>115
It will be completely a different baseball game.
I think it would have been a bundle of potential if they had completely copied the Yansubreak system.
>>117
That’s no good, chiyo!!!
It’s not allowed to mention K〇NAMI’s name!
Chiyo is going to burn!
If the cucumber can’t win the game, it’s just weak, right?!
It became rough!
No matter how much my stamina decreases, I won’t fail!
The continuation rate will drop!
It’s Su-san who is contradicting, and that’s bad.
You shouldn’t learn even the strange culture of nameless people, you useless dog!
If it’s auto, then Centlight is good!
I heard something good! Thank you, Chiyo! I love you!
To be honest, since you can easily achieve enough high stakes with High Seiko, there’s really not much need to work hard on other routes.
>>122
In other words, the gimmicks on other routes are currently somewhat tough, so I don’t want to do them.
Sentlight is in an absolutely fantastic condition, especially when it comes to races.
Sue is weak despite not being stable at pachinko.
There is no strength that can be gained by overcoming that instability.
🖥🔥🔥🔥
If there is too much disparity in routes, there will likely be some adjustments, so I think basic research is necessary.
I don’t know, though.
Mr. Seiko has an early refactoring point, and once that’s surpassed, it’s certain to take a certain form.
You can go with the sense of Junior Ritamaru.
>>128
Surprisingly, I get distracted by the rank 2 green hints doubling or the blue hint rate being 200 percent, and as a result, I end up getting a red 3 and drawing a weak character, which is how it ends.
I think if you have self-control, you basically won’t have accidents in the early game! Let’s properly aim for rank 2 red!
Considering that aiming for extreme upsides can be tough on motivation, there’s a feeling that it’s fine to go with Seiko-san, who has a high average…
Well, if you take two bonds for the training effect and press on the places that are shining a lot, you’ll manage to some extent, so in the new scenario, there’s effectively just one choice, which is the High Seiko route.
>>131
This is something that shouldn’t be said, but…
In the first place, there are also cases where other effects seem conditional.
For example, super good condition only increases by 10% compared to the good condition.
The effect of the St. Light is essentially limited to a practice effect of +25% after four turns, even when using a dedicated one.
In the 7th training, you can get a 100 stat boost from Spishin, but when divided by 7, it essentially equates to about a 1-turn +15 ability boost.
So, with High Seiko being the issue, you can receive a practice effect of +15 just from having one mob friendship.
If this activates nearly every turn, then it’s definitely a choice for High Seiko.
Since this can be understood within the scope of a calculator, it makes sense to choose only the high-sei call route!
At this point in the calculations, neither of you can surpass High Seiko anymore!
Since the other two don’t have any pity or friendship, they tend to be lacking in other stats despite being sharp, so I think it’s fine to have Seiko-chan.
I’m glad I happened to see and read it…
I feel like my understanding of maneuvering has improved a bit.
It’s strangely amusing that the ◯◯ premise ×× thread has become standardized.
Originally a terrible troll.
If you can’t teach properly, it would be fine just to use Taiki’s thread.
>>135
Well then, let’s make a wonderful proposal.
Would you like to become chiyo as well?
Chiyo is good.
I can troll the thread.
I can stir up the thread.
>>140
Not a single one is wonderful!
>>140
Let’s go get vaccinated so we won’t become a nuisance.
Please tell me the support card setup for the mile.
I was so dependent on Su-san, but maybe I’ll switch to Seiko-chan…
Indeed, the idols who shaped the era are on a different level.
Seiko-chan’s ability to easily assemble one move ahead is extremely strong.
![[Rune Factory] I’m sorry, but I live behind the general shrine.](https://otaku-reviews.net/wp-content/uploads/2025/06/af0f4933.jpg)
![[Monster Hunter Wilds] I wonder if those who bomb with low ratings want to kill the series.](https://otaku-reviews.net/wp-content/uploads/2025/06/618be522.png)
![[Manga] The magic trick that everyone tried to master as kids but couldn’t is trending, lol.](https://otaku-reviews.net/wp-content/uploads/2025/06/bf53dd2f.jpg)
![[Gundam GQuuuuuuX] Even though you’re a Newtype, you’re so insensitive, Egusabe-kun.](https://otaku-reviews.net/wp-content/uploads/2025/06/b96ae33d.jpg)
![[Manga Time Kirara] Tell me your favorite couple in Kirara.](https://otaku-reviews.net/wp-content/uploads/2025/06/7f363a8b.jpg)
![[Fullmetal Alchemist] I have no certainty, but I feel like Envy is the weakest among the homunculi.](https://otaku-reviews.net/wp-content/uploads/2025/06/da613d5c.png)
![[Thunder thunder thunder] I thought this cover was sexy… so I bought it, and it turned out to be more interesting than I expected.](https://otaku-reviews.net/wp-content/uploads/2025/06/d303d5fc.jpg)